 7324 Atoll Ave, North Hollywood, CA 91605 (818) 765-1665, License: C54 and C29

Call Today!
(818) 765-1665
Tile Installation
 Splendid Stone and Tile has been serving the Greater Los Angeles, CA area since 1983, with the best tile fabrication and installation services around. Whether you are remodeling or starting from scratch, your home or business installation projects can seem daunting. Do not compromise on a low-quality job or material. Our professional team of experts will help you choose the best material for your project and draft a plan for perfect execution.
Please review the portfolio gallery to get a feel for our high-end capabilities.
The team is constantly improving its methods and knowledge to provide you with the highest quality tile installation job. Our Los Angeles, CA facility has unique methods of training to ensure skilled masons are available for top-notch work. Each member of the team has been selected based on their knowledge and experience in the tile industry. Come, visit the warehouse, and let us help make your next project splendid.
Common tile and stone installation locations:
- Private Homes
- Offices
- Restaurants
- Hotels
- Small and Big Businesses
- Nationwide Stores
- Shopping Malls
- Apartment Buildings
Common tile and stone installation surfaces (but not limited to):
- Kitchen Sinks
- Kitchen Countertops
- Backsplashes
- Bathroom Jacuzzis
- Showers
- Bathrooms
- Bathtubs
- Living Rooms
- Fireplaces
- Cocktail Bars
- Frames
- Walls
So, What Exactly is the Tile installation Process?
The First, and most important step in the installation and fabrication process, is to take precise measurements of the surface area you are looking to cover. Stone and tile slabs are often very big, and inaccurate cuts can lead to disastrous outcomes. Slabs cut too large yield sloppy results and those that are cut too small become practically unusable. The stone cutters use advanced equipment to prevent errors and ensure precise results. A trained mason will work with you to create an accurate 3D sketch and blueprint.
The Second Step is the preparation of the surface area.
A team member will come to your home or business and make sure that outlet covers, switch plates and all related hardware covers are removed; failure to do this may result in damage to the stone and tile or vice versa. Next, the surfaces will be sanded with coarse-grit sandpaper to ensure strong, long-lasting adhesion of your stone or tile. When the sanding is complete, the remaining dust and excess particles can be easily wiped down with a damp rag.
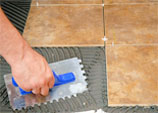
The Third Step begins with the application of a thin set mortar/mastic to the surface area. This must be done with a proper trowel. It is important to avoid over-skinning the mortar—just enough should be laid out for 6-8 tile pieces. If tile is being installed on a wall, a notched trowel should be used at a shallow angle. In this case, mortar is applied in long, sweeping motions—starting from the intersection point of the wall and counter. In order to prevent crooked surfaces, tile is installed along a straight edge first.
The Fourth Step is installing and cutting the tile.
The installation process starts by pushing the tile piece into the mortar. A spacer is used to ensure even spaces between each piece. Mortar is not applied to the last tile, as it will need to be cut to size—a mark is made on the last piece to indicate the cutting point. To cut tile in a straight line a snap tile cutter is used. For cutting custom shapes and designs, a wet tile saw is the preferred tool.
The Fifth Step is grouting the joints between the tile sections. The bonding mortar will cure and dry in about 24 hours. After that you will be able to apply the grout between tiles.
Quick and Easy Grouting Tips:
- If joints are 1/8 inch (3 mm) or less, use unsanded grout.
- If joints are wider than 1/8 inch, use sanded grout.
- Read the grout pack instructions before opening and always follow the manufacturer’s directions (it is best to mix the grout in a clean plastic bowl or bucket).
- Scoop a small amount from the mixed grout and apply it along the tile joints using a rubber grout float.
- Make sure to press firmly to avoid creating air bubbles. Each joint should be applied individually.
- When all joints are filled with grout, rub the tiles gently (avoid touching the joints) with a sponge and water to clean excess grout from the surface; it will be dry in approximately 30 minutes.
- You will notice a hazy film on the tiles. This is perfectly normal—just use a dry cloth/cheese cloth to wipe it off.